Setting up a printer for the first time can feel a little overwhelming, but by following these simple steps, you’ll have your printer up and running in no time:
- Unbox & Connect: Remove the printer from its packaging and plug it into a power source.
- Install Cartridges: Insert the ink or toner cartridges carefully as per your printer model.
- Load Paper: Place compatible paper into the input tray.
- Adjust Preferences: Set the time, language, and country/region on your printer.
- Install Software: Download and install the required drivers/software to connect the printer to your PC or mobile.
- Test Print: Print a test page to ensure everything is working properly.

If your printer suddenly stops responding, it might be due to the common “printer offline” issue. The good news is that you can usually fix this problem at home with a few simple steps:
- Check Connections: Ensure the USB or network cable is properly connected and secure.
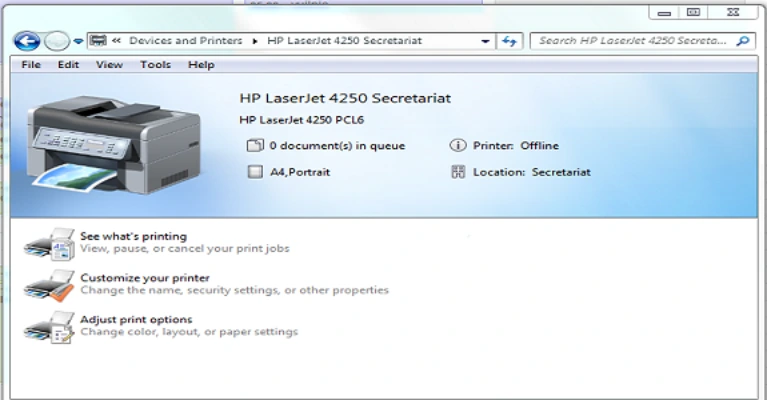
- Set Printer Online: Manually switch your printer status from offline to online through your computer’s settings.
- Clear Print Queue: Remove all pending print jobs that may be blocking new ones.
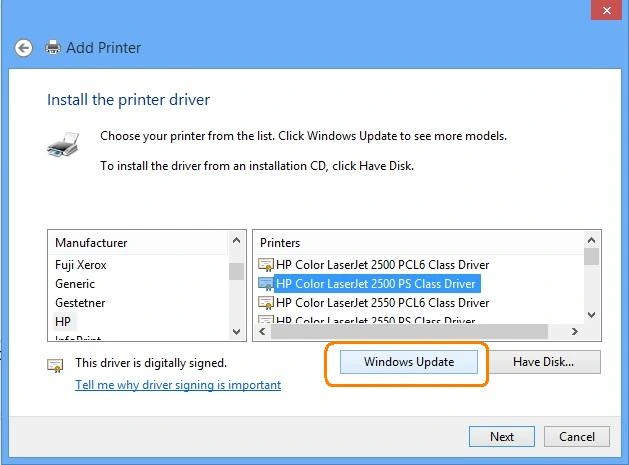
- Update or Reinstall Drivers: Outdated or corrupted drivers can cause offline issues—install the latest drivers for your printer model.
- Run Troubleshooting Tool: Use tools like the “Print and Scan Doctor” to automatically detect and fix printer errors.
- Check for Paper Jams: Inspect the input tray for stuck paper and carefully remove it if found.
If your printer keeps showing an offline status, one of the easiest ways to fix it is by using the official HP Print and Scan Doctor tool. Here’s how you can do it:
- Download the Tool: Start by downloading the Print and Scan Doctor from the official HP website.
- Run the Application: Once downloaded, click Run from your computer’s “Downloads” folder.
- Select Your Printer: When the tool opens, choose your printer from the list of available devices.
- Allow Updates: If the screen prompts you to turn on printer updates, click Yes to proceed.
- Set as Default Printer: If asked, confirm the option to set your printer as the default one.
- Follow Instructions: Complete all on-screen steps to let the tool diagnose and fix issues.
By following these steps, most offline errors can be resolved quickly. However, if the issue continues, you may need professional assistance to ensure your printer is fully operational.